> ## Documentation Index
> Fetch the complete documentation index at: https://docs.wisepim.com/llms.txt
> Use this file to discover all available pages before exploring further.
# Managing Product Attributes
> Create and organize custom fields that define your product data model. Set up text, number, select, image, and file attributes to structure your catalog.
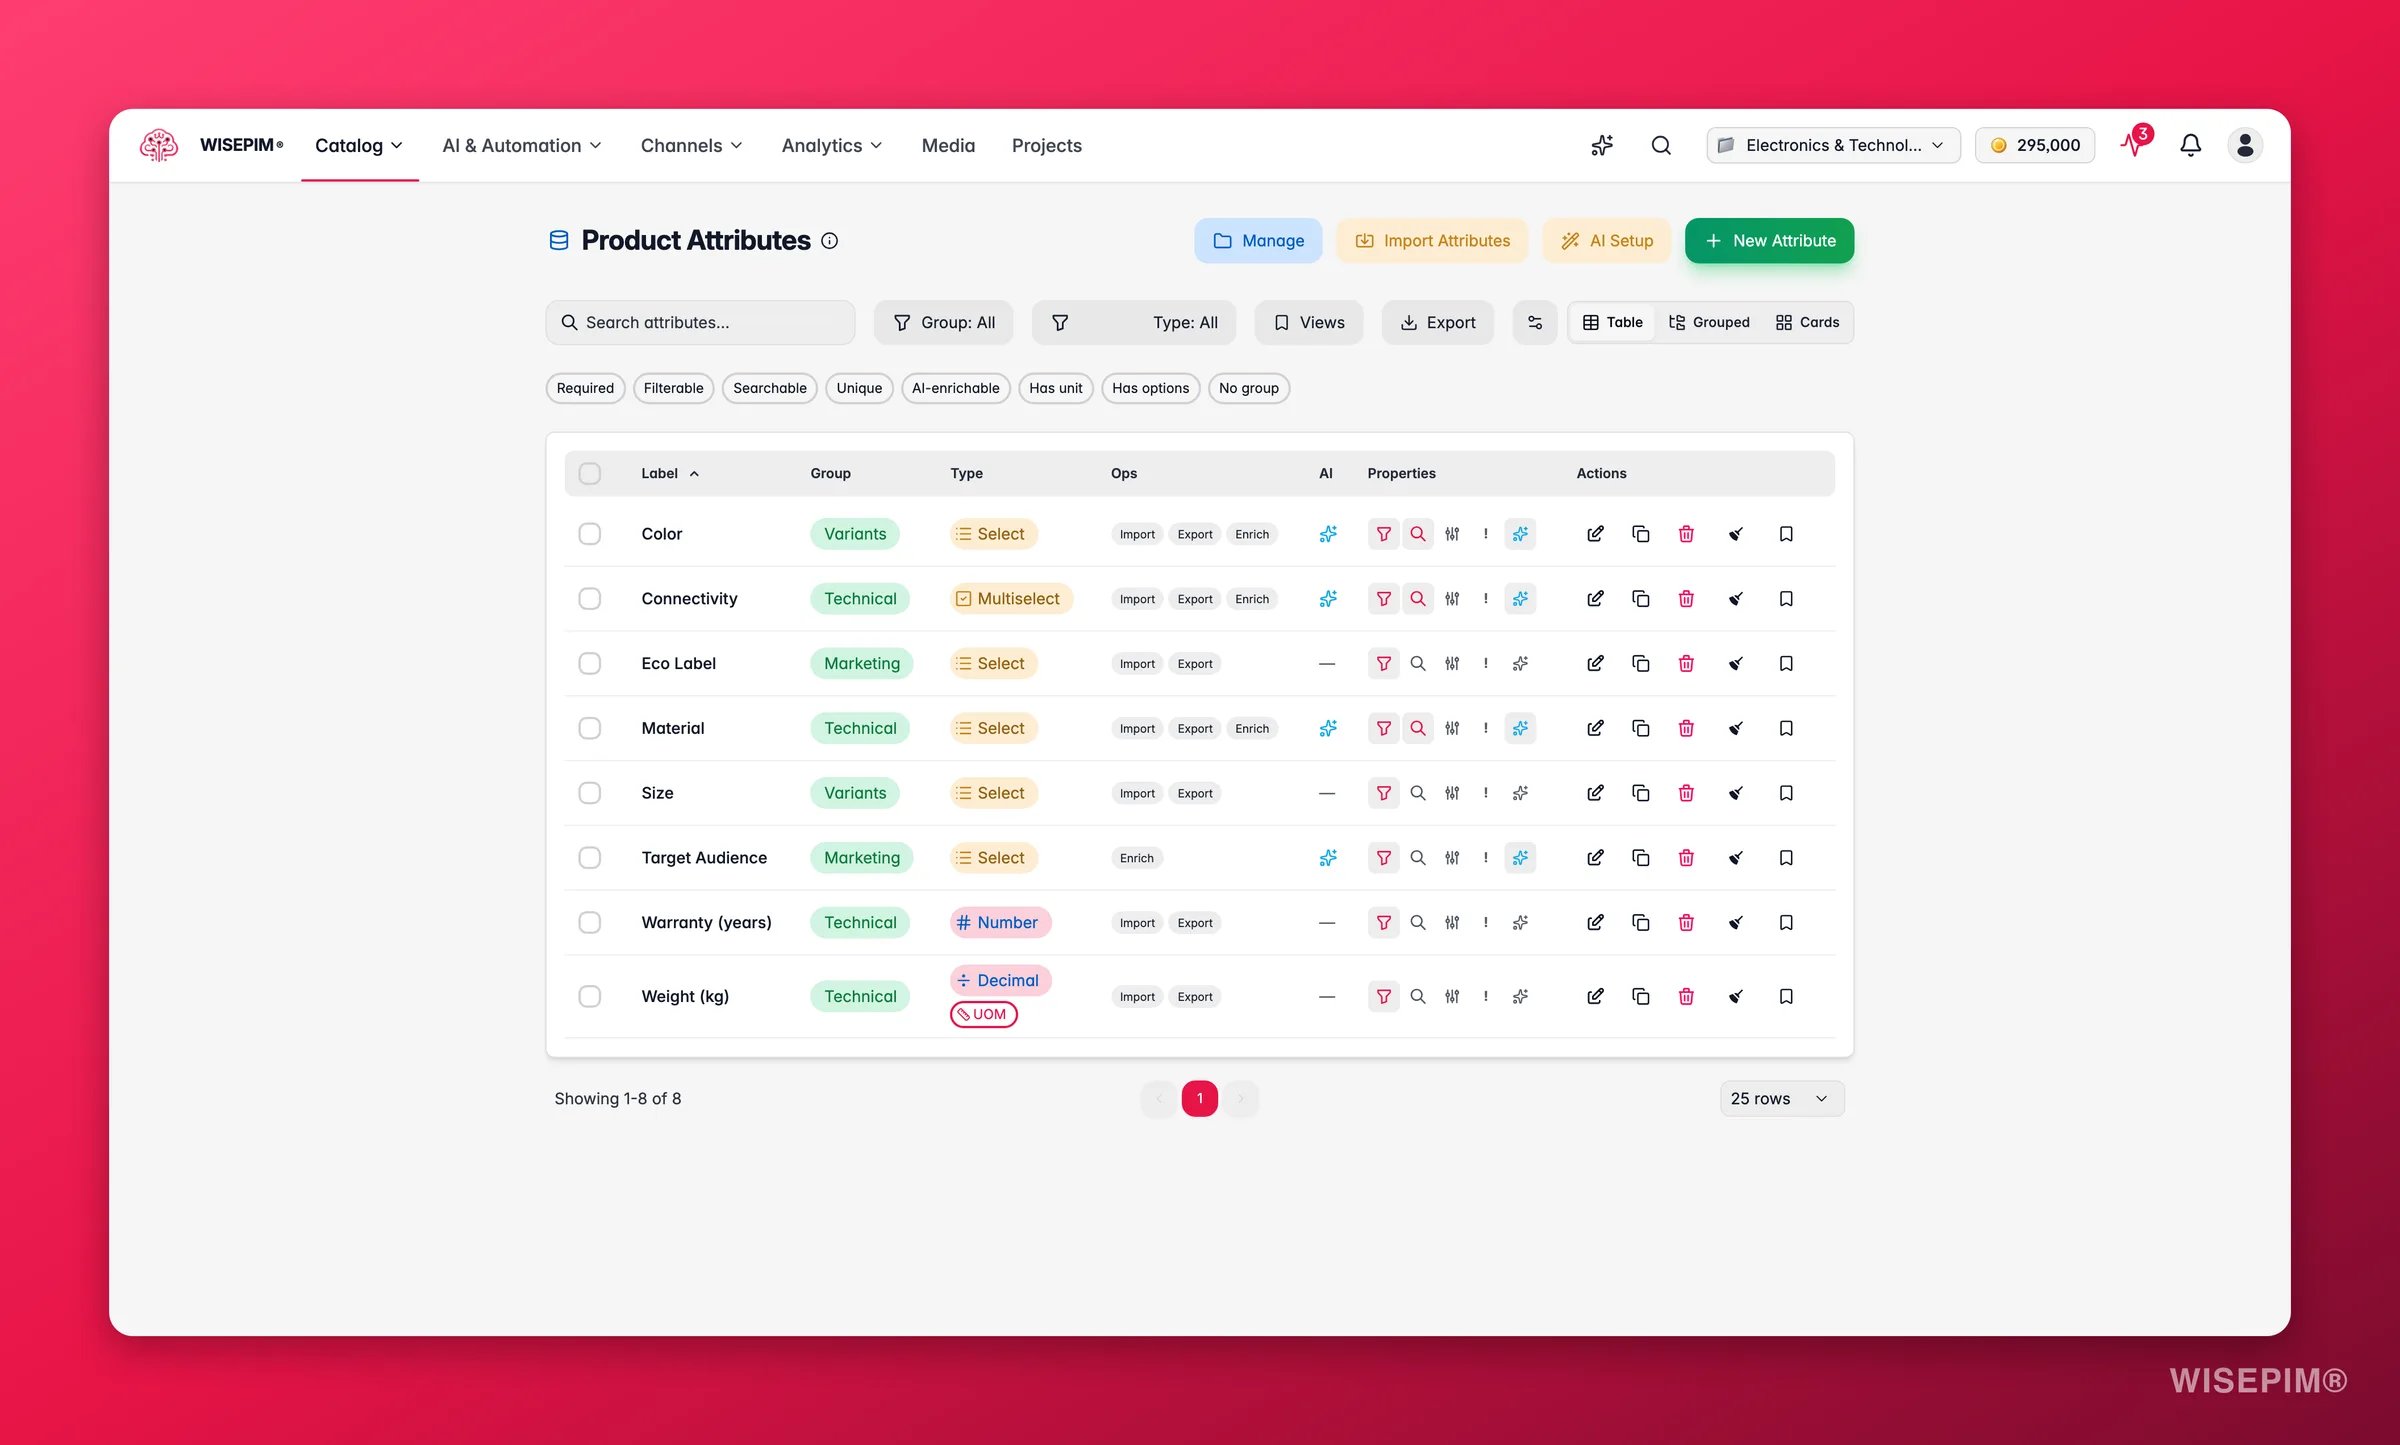
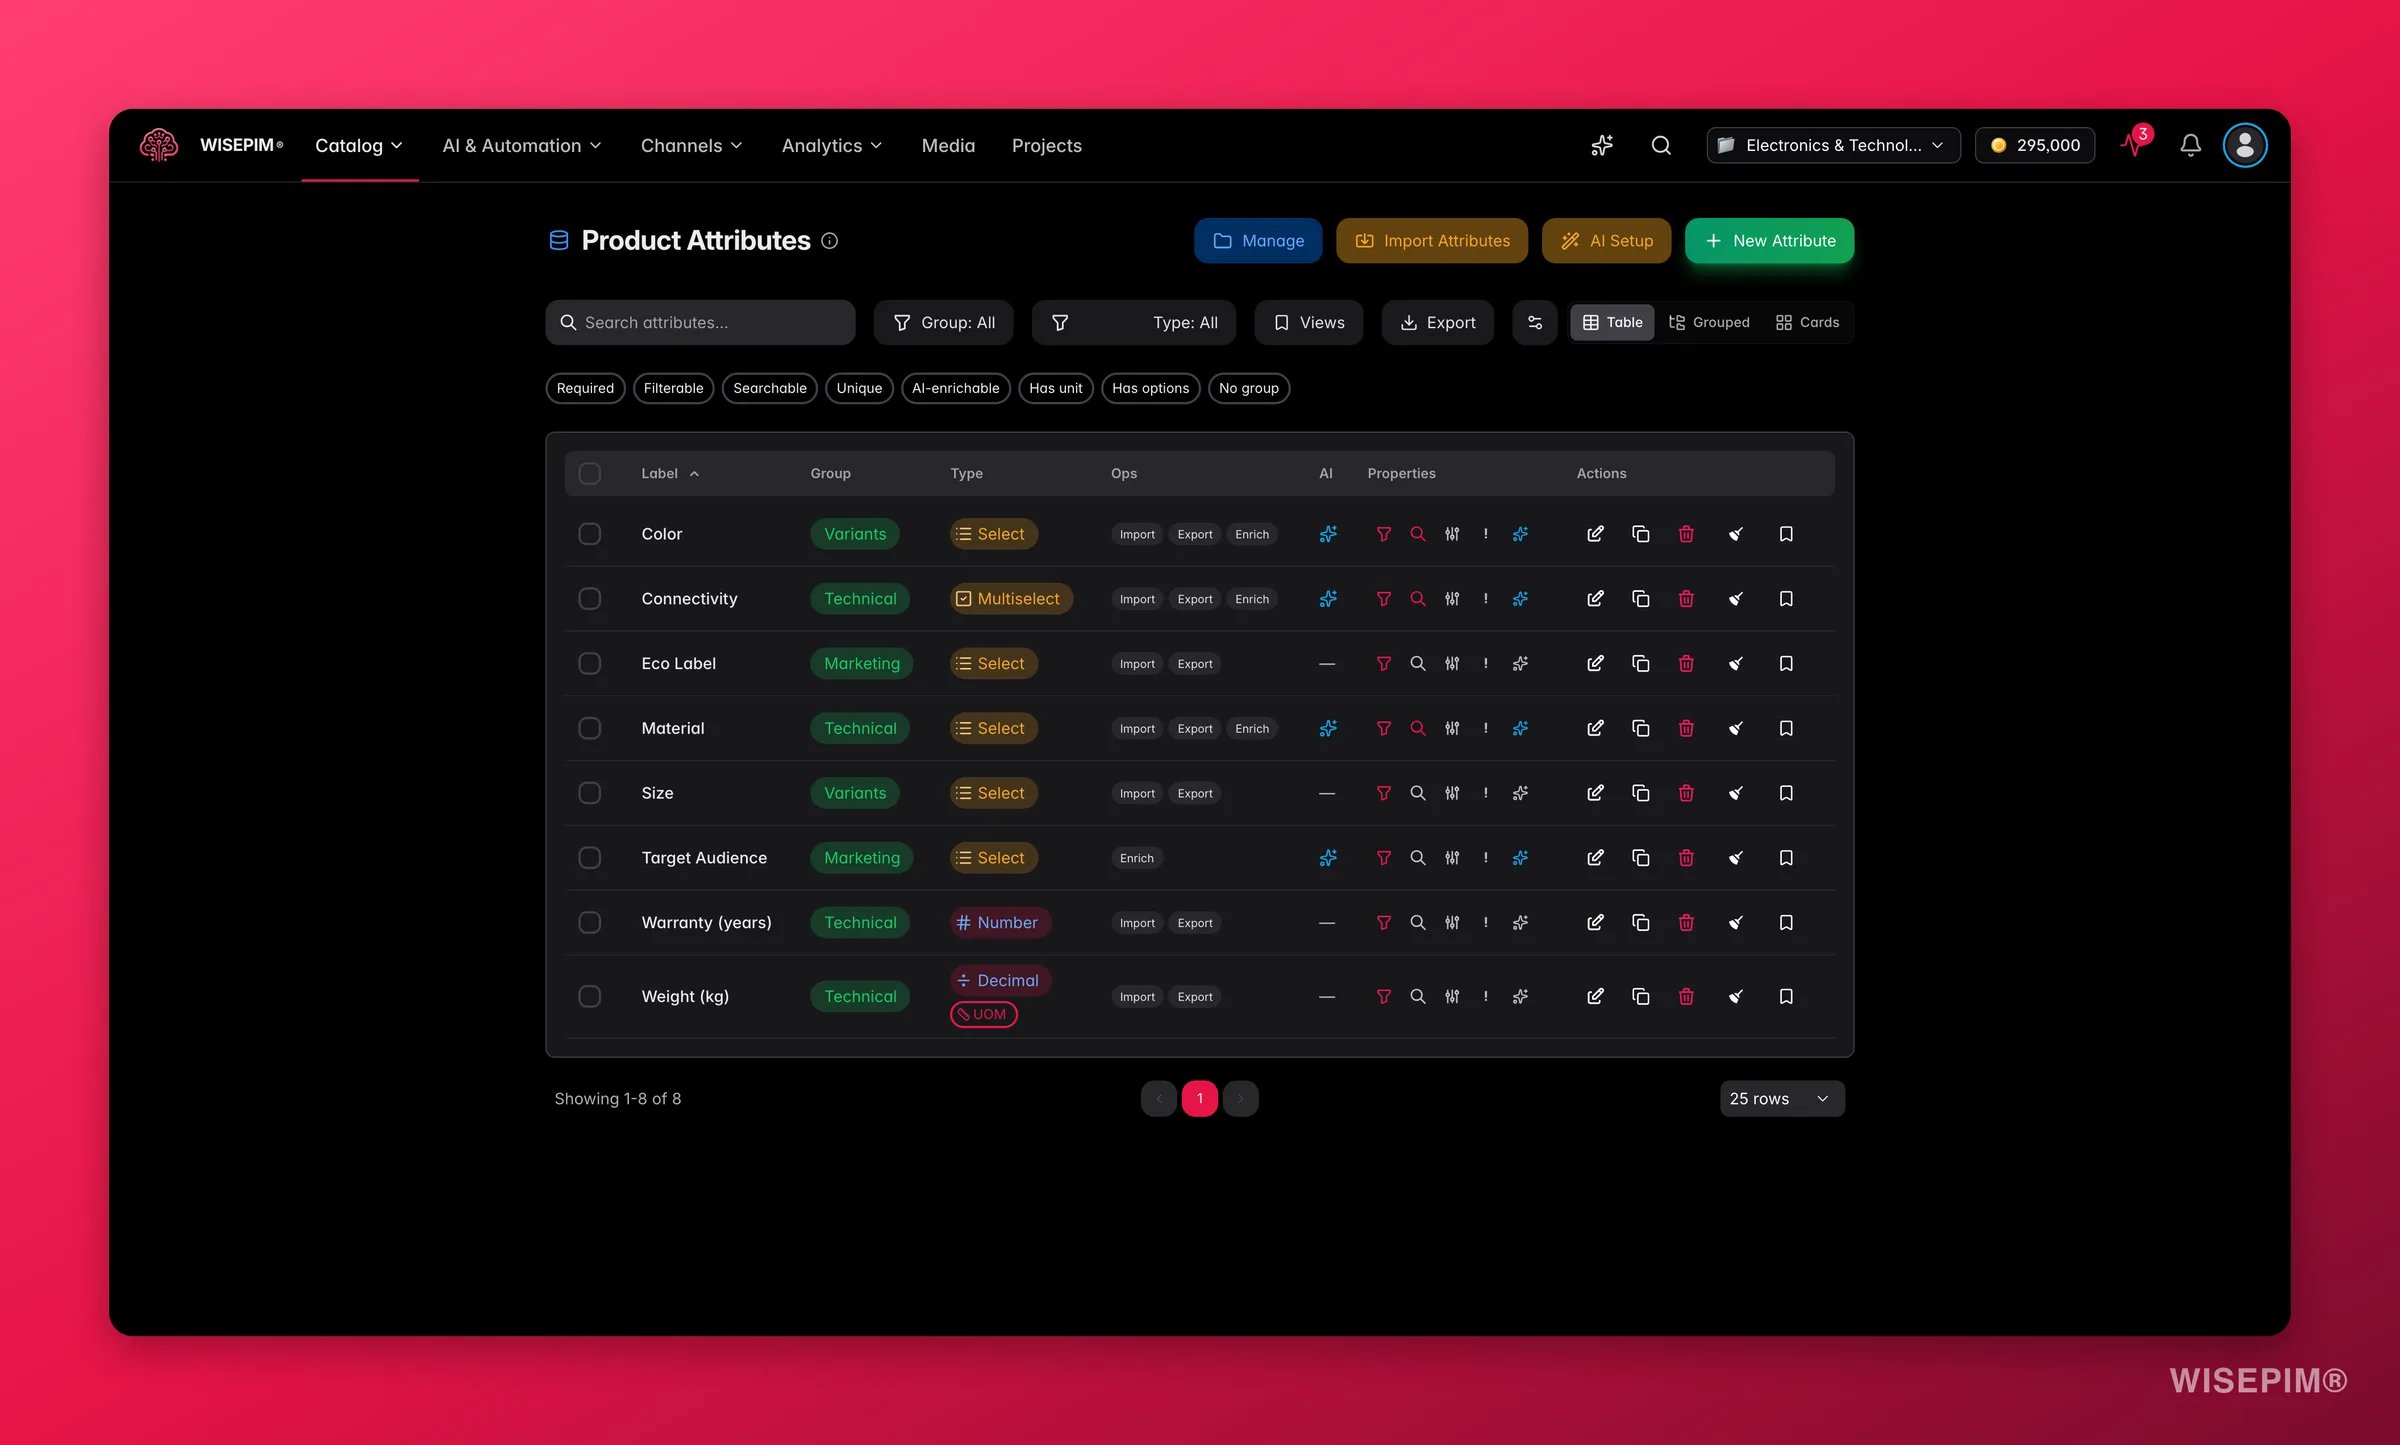 Attributes are the building blocks of your catalog. Each one is a custom field that holds a specific piece of product data: a color, a weight, a description, an image. Together, they form the data model every product follows. Set them up well and every product stays consistent, searchable, and easy to filter.
Attributes are shared across your project. When you create an attribute, it becomes available for assignment to any [product family](/en/products/product-families).
## Attribute Types
WISEPIM supports a range of attribute types to cover different kinds of product data:
| Type | Use case | Example |
| ---------------- | ---------------------------- | ------------------------------- |
| **Text** | Short single-line values | Product name, SKU, brand |
| **Text Area** | Longer multi-line content | Descriptions, care instructions |
| **Number** | Whole numbers | Warranty years, piece count |
| **Decimal** | Numbers with decimals | Weight, dimensions, price |
| **Date** | Date values | Release date, expiry date |
| **DateTime** | Date and time values | Sale start time |
| **Select** | Single choice from a list | Size (S, M, L), Color |
| **Multi-Select** | Multiple choices from a list | Compatible devices, features |
| **Boolean** | True/false toggle | Waterproof, wireless |
| **Color** | Color picker | Primary color |
| **Image** | Image upload | Product photo, diagram |
| **File** | File upload | User manual, certificate |
Use **Select** and **Multi-Select** instead of free text whenever the values are predictable. This keeps your data consistent and makes filtering reliable.
## Creating an attribute
Attributes are the building blocks of your catalog. Each one is a custom field that holds a specific piece of product data: a color, a weight, a description, an image. Together, they form the data model every product follows. Set them up well and every product stays consistent, searchable, and easy to filter.
Attributes are shared across your project. When you create an attribute, it becomes available for assignment to any [product family](/en/products/product-families).
## Attribute Types
WISEPIM supports a range of attribute types to cover different kinds of product data:
| Type | Use case | Example |
| ---------------- | ---------------------------- | ------------------------------- |
| **Text** | Short single-line values | Product name, SKU, brand |
| **Text Area** | Longer multi-line content | Descriptions, care instructions |
| **Number** | Whole numbers | Warranty years, piece count |
| **Decimal** | Numbers with decimals | Weight, dimensions, price |
| **Date** | Date values | Release date, expiry date |
| **DateTime** | Date and time values | Sale start time |
| **Select** | Single choice from a list | Size (S, M, L), Color |
| **Multi-Select** | Multiple choices from a list | Compatible devices, features |
| **Boolean** | True/false toggle | Waterproof, wireless |
| **Color** | Color picker | Primary color |
| **Image** | Image upload | Product photo, diagram |
| **File** | File upload | User manual, certificate |
Use **Select** and **Multi-Select** instead of free text whenever the values are predictable. This keeps your data consistent and makes filtering reliable.
## Creating an attribute
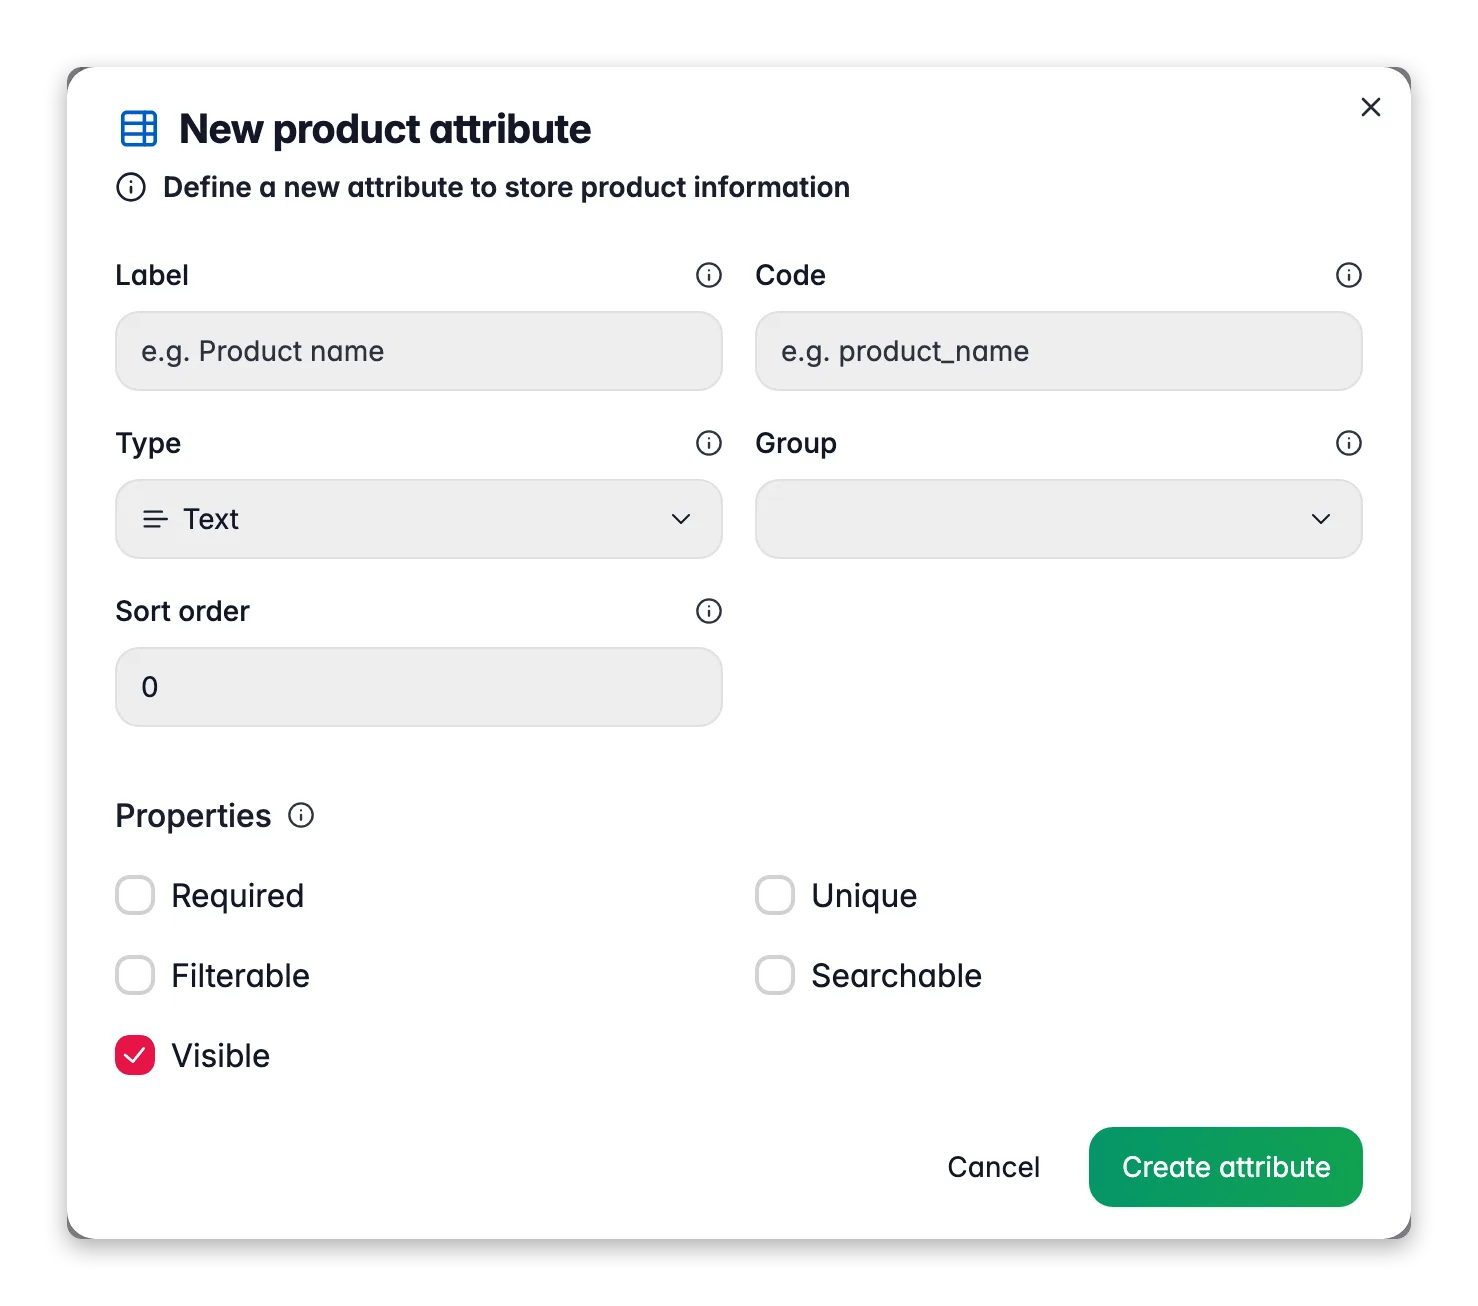
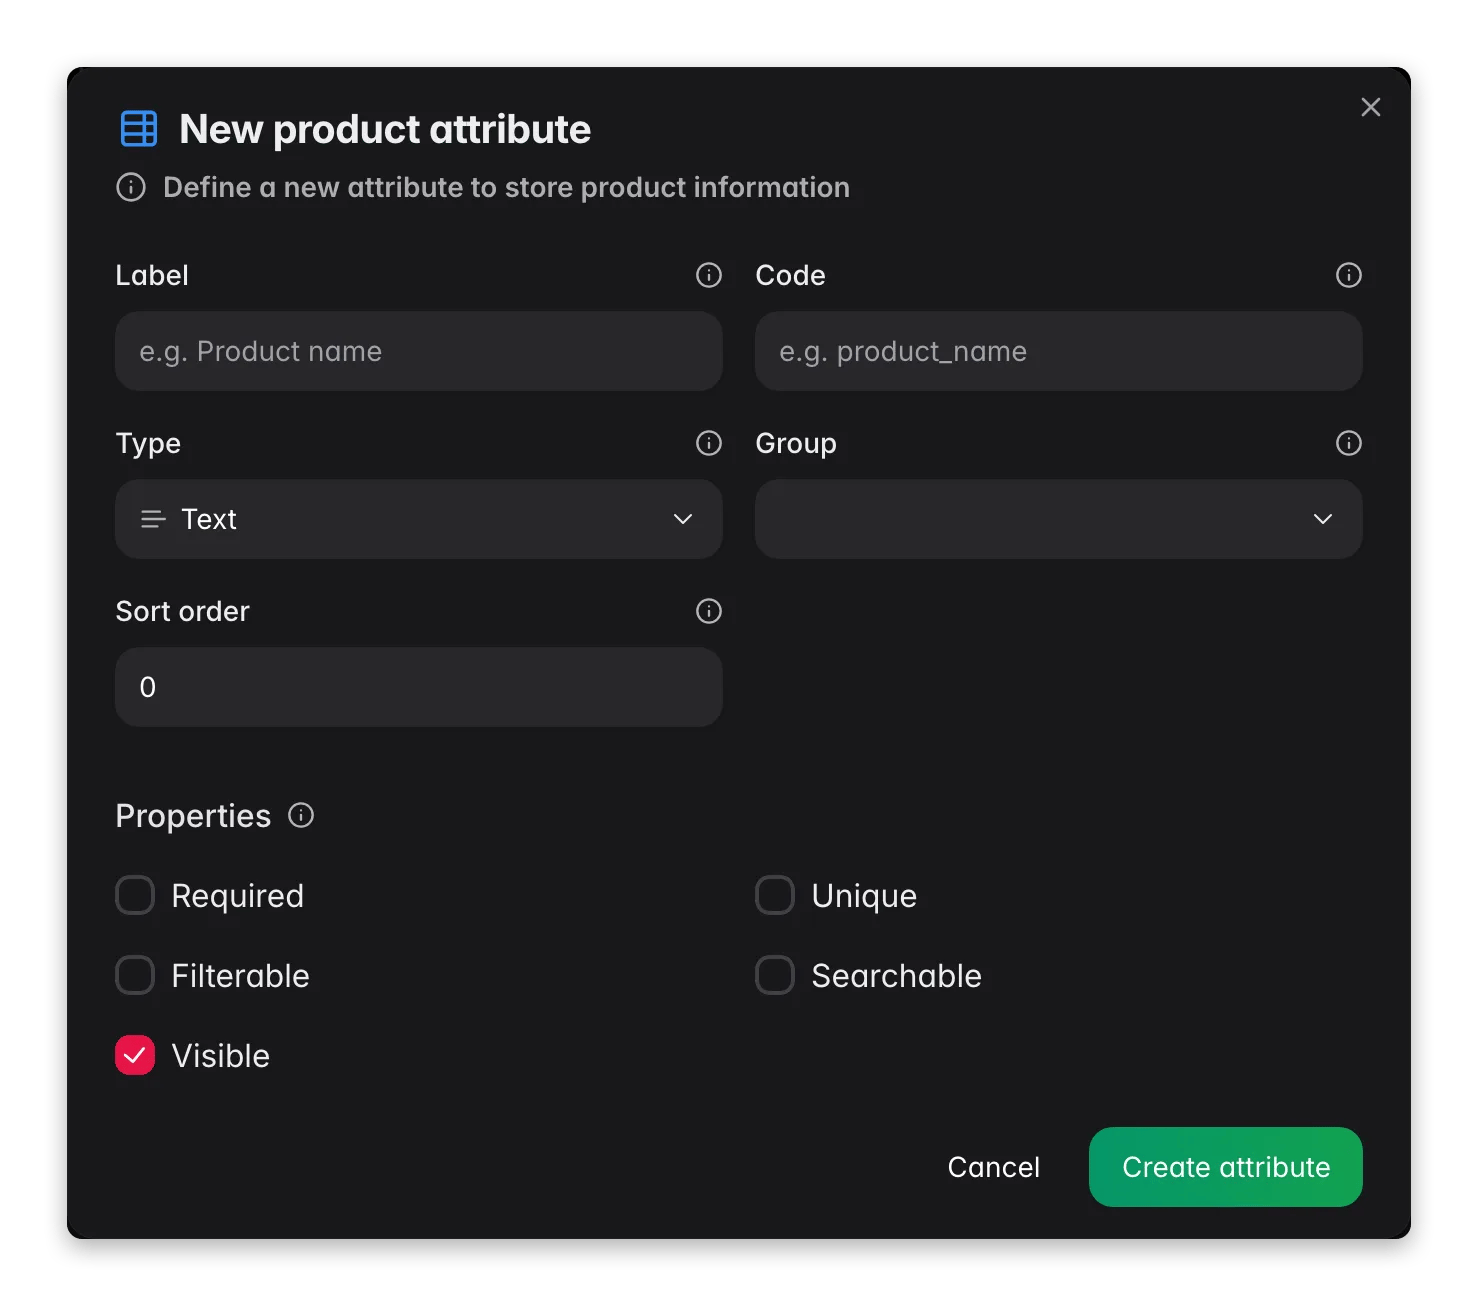 The New Attribute form keeps creation fast. It captures only the essentials, so you can add a field and move on. Everything else (validation, cleaning, enrichment) lives in the attribute's settings, which you open after creating it.
Navigate to **Product Attributes** from the sidebar.
Click the **New Attribute** button to open the creation form.
Enter a **Label** (the human-readable name) and select the **Type**. The **Code** (the technical identifier) is generated from the label as you type, and you can edit it.
Optionally pick an **attribute group** and set a **sort order**. These control where the field appears in product forms.
Toggle whether the attribute is **required**, **unique**, **filterable**, **searchable**, or **visible** in product forms. New attributes are visible by default.
For **Select** and **Multi-Select**, choose between custom inline options or a shared [attribute options set](#attribute-options-shared-value-lists). You can also tick **allow new options on import** so that imported values you have not predefined get added automatically instead of being dropped. For **Number** and **Decimal**, you can link a [unit of measure](/en/products/units-of-measure) code set.
Click **Create Attribute**. It is now available for assignment to product families.
The attribute code cannot be changed after creation. Use a descriptive, lowercase format like `screen_size_inches` or `is_waterproof`. Codes also cannot clash with reserved system fields such as `sku`, `price`, `brand`, or `weight`.
Some plans cap the number of custom attributes. When you reach the limit, the page shows a counter chip and the **New Attribute** button becomes an upgrade prompt. [Upgrade your plan](/en/settings/billing) to add more.
## Attribute properties
Set these five toggles when you create an attribute. They shape how the field behaves across your catalog:
* **Required**: must be filled in for all products that use this attribute.
* **Unique**: no two products can have the same value for this attribute.
* **Filterable**: can be used to filter the product list.
* **Searchable**: included in product search results.
* **Visible**: shown in product forms and displays.
Mark a field **Filterable** when shoppers or your team will want to slice the catalog by it (color, brand, size). Mark it **Searchable** when its value is something people type to find a product.
You do not have to reopen the form to change these later. In the list view, each row has a strip of one-click property toggles for **Filterable**, **Searchable**, **Unique**, **Required**, and **AI enrichable**. Click one and it updates instantly, so you can fine-tune your whole model without opening a single modal.
## Quick edit vs full settings
There are two ways to change an attribute after it exists, and they do different jobs:
* **Quick edit** (the pencil icon on a row) reopens the same basic fields you set on creation: label, type, group, sort order, the five properties, and the value source for select types. The code stays read-only. Use it for everyday tweaks. The Save button highlights only when you have unsaved changes, so you always know where you stand.
* **Settings** (the broom icon on a row) opens the deeper, tabbed configuration below: validation rules, data cleaning, enrichment behavior, quality weight, and platform mapping. Use it when you want the field to enforce clean data or take part in AI enrichment.
Need a near-identical attribute? Use the **duplicate** action on any row. It copies the attribute and its settings, then opens the copy for editing so you only change what differs.
## Configure attribute settings (after creating)
Creating an attribute defines the field. Configuring its settings makes the field smart: it enforces clean data, lets AI fill it in, and tunes how much it counts toward your quality score. Open these from the **settings (broom)** action next to any attribute.
The settings open in a tabbed modal. Which tabs and options appear depends on the attribute type.
### General
* **Import, export, and enrichment toggles**: choose which operations this attribute takes part in.
* **AI enrichable**: allow AI to suggest or generate values for this field.
* **Quality weight**: how much this attribute counts toward a product's completeness score, on a scale from nice-to-have to critical. For number and decimal fields you can also set a unit and a plausible min/max, so the quality checks can flag values that fall outside a sensible range.
### Validation rules
Enforce data quality so bad values never reach your channels:
* **Text length**: minimum and maximum character limits, plus a format pattern (email, URL, alphanumeric, phone).
* **Number ranges**: acceptable min and max values, and decimal precision for decimal fields.
* **Date ranges**: earliest and latest allowed dates, and a date format.
* **Selections**: minimum and maximum number of choices for multi-select, plus per-option rules (length, pattern, uniqueness, and a custom error message).
### Data cleaning
Cleaning rules normalize values automatically during import and editing, so your data stays consistent without manual work:
* **Basic**: trim whitespace, remove empty values, collapse extra spaces, and convert blanks to a fallback value.
* **Text**: normalize case, strip special characters, fix encoding, strip or limit HTML, and convert line breaks.
* **Numbers**: remove currency symbols, standardize thousand and decimal separators, and round to a set precision.
* **Options**: deduplicate, sort, and map similar values together so "Blue" and "blue" become one.
### Enrichment
For text fields, tune how AI fills the attribute:
* **Confidence threshold**: minimum confidence score required before a suggestion is used. Higher means fewer but more reliable values.
* **Enable AI suggestions** and **require manual review**: decide whether a person checks AI output before it is applied.
* **Word limits**: minimum and maximum word counts for generated text.
* **Enrichment instructions**: tell the AI exactly what this field should contain, for example "Extract the screen size in inches from the specifications".
### Platforms
This tab shows how the attribute maps to each connected sales channel (Magento, a webshop, a marketplace). Mapping itself happens in the data mapping tool, and the tab links you straight there so you can line up your internal field with the platform's field, mark it as a configurable or variant attribute, and keep exports consistent.
## Build a whole data model with the AI Data Model Architect
Starting from scratch, or moving into a new industry? The AI Data Model Architect generates a complete starting model for you: attributes, attribute groups, and families, all at once. Open it from the **AI Data Model Architect** button on the Product Attributes page.
The New Attribute form keeps creation fast. It captures only the essentials, so you can add a field and move on. Everything else (validation, cleaning, enrichment) lives in the attribute's settings, which you open after creating it.
Navigate to **Product Attributes** from the sidebar.
Click the **New Attribute** button to open the creation form.
Enter a **Label** (the human-readable name) and select the **Type**. The **Code** (the technical identifier) is generated from the label as you type, and you can edit it.
Optionally pick an **attribute group** and set a **sort order**. These control where the field appears in product forms.
Toggle whether the attribute is **required**, **unique**, **filterable**, **searchable**, or **visible** in product forms. New attributes are visible by default.
For **Select** and **Multi-Select**, choose between custom inline options or a shared [attribute options set](#attribute-options-shared-value-lists). You can also tick **allow new options on import** so that imported values you have not predefined get added automatically instead of being dropped. For **Number** and **Decimal**, you can link a [unit of measure](/en/products/units-of-measure) code set.
Click **Create Attribute**. It is now available for assignment to product families.
The attribute code cannot be changed after creation. Use a descriptive, lowercase format like `screen_size_inches` or `is_waterproof`. Codes also cannot clash with reserved system fields such as `sku`, `price`, `brand`, or `weight`.
Some plans cap the number of custom attributes. When you reach the limit, the page shows a counter chip and the **New Attribute** button becomes an upgrade prompt. [Upgrade your plan](/en/settings/billing) to add more.
## Attribute properties
Set these five toggles when you create an attribute. They shape how the field behaves across your catalog:
* **Required**: must be filled in for all products that use this attribute.
* **Unique**: no two products can have the same value for this attribute.
* **Filterable**: can be used to filter the product list.
* **Searchable**: included in product search results.
* **Visible**: shown in product forms and displays.
Mark a field **Filterable** when shoppers or your team will want to slice the catalog by it (color, brand, size). Mark it **Searchable** when its value is something people type to find a product.
You do not have to reopen the form to change these later. In the list view, each row has a strip of one-click property toggles for **Filterable**, **Searchable**, **Unique**, **Required**, and **AI enrichable**. Click one and it updates instantly, so you can fine-tune your whole model without opening a single modal.
## Quick edit vs full settings
There are two ways to change an attribute after it exists, and they do different jobs:
* **Quick edit** (the pencil icon on a row) reopens the same basic fields you set on creation: label, type, group, sort order, the five properties, and the value source for select types. The code stays read-only. Use it for everyday tweaks. The Save button highlights only when you have unsaved changes, so you always know where you stand.
* **Settings** (the broom icon on a row) opens the deeper, tabbed configuration below: validation rules, data cleaning, enrichment behavior, quality weight, and platform mapping. Use it when you want the field to enforce clean data or take part in AI enrichment.
Need a near-identical attribute? Use the **duplicate** action on any row. It copies the attribute and its settings, then opens the copy for editing so you only change what differs.
## Configure attribute settings (after creating)
Creating an attribute defines the field. Configuring its settings makes the field smart: it enforces clean data, lets AI fill it in, and tunes how much it counts toward your quality score. Open these from the **settings (broom)** action next to any attribute.
The settings open in a tabbed modal. Which tabs and options appear depends on the attribute type.
### General
* **Import, export, and enrichment toggles**: choose which operations this attribute takes part in.
* **AI enrichable**: allow AI to suggest or generate values for this field.
* **Quality weight**: how much this attribute counts toward a product's completeness score, on a scale from nice-to-have to critical. For number and decimal fields you can also set a unit and a plausible min/max, so the quality checks can flag values that fall outside a sensible range.
### Validation rules
Enforce data quality so bad values never reach your channels:
* **Text length**: minimum and maximum character limits, plus a format pattern (email, URL, alphanumeric, phone).
* **Number ranges**: acceptable min and max values, and decimal precision for decimal fields.
* **Date ranges**: earliest and latest allowed dates, and a date format.
* **Selections**: minimum and maximum number of choices for multi-select, plus per-option rules (length, pattern, uniqueness, and a custom error message).
### Data cleaning
Cleaning rules normalize values automatically during import and editing, so your data stays consistent without manual work:
* **Basic**: trim whitespace, remove empty values, collapse extra spaces, and convert blanks to a fallback value.
* **Text**: normalize case, strip special characters, fix encoding, strip or limit HTML, and convert line breaks.
* **Numbers**: remove currency symbols, standardize thousand and decimal separators, and round to a set precision.
* **Options**: deduplicate, sort, and map similar values together so "Blue" and "blue" become one.
### Enrichment
For text fields, tune how AI fills the attribute:
* **Confidence threshold**: minimum confidence score required before a suggestion is used. Higher means fewer but more reliable values.
* **Enable AI suggestions** and **require manual review**: decide whether a person checks AI output before it is applied.
* **Word limits**: minimum and maximum word counts for generated text.
* **Enrichment instructions**: tell the AI exactly what this field should contain, for example "Extract the screen size in inches from the specifications".
### Platforms
This tab shows how the attribute maps to each connected sales channel (Magento, a webshop, a marketplace). Mapping itself happens in the data mapping tool, and the tab links you straight there so you can line up your internal field with the platform's field, mark it as a configurable or variant attribute, and keep exports consistent.
## Build a whole data model with the AI Data Model Architect
Starting from scratch, or moving into a new industry? The AI Data Model Architect generates a complete starting model for you: attributes, attribute groups, and families, all at once. Open it from the **AI Data Model Architect** button on the Product Attributes page.
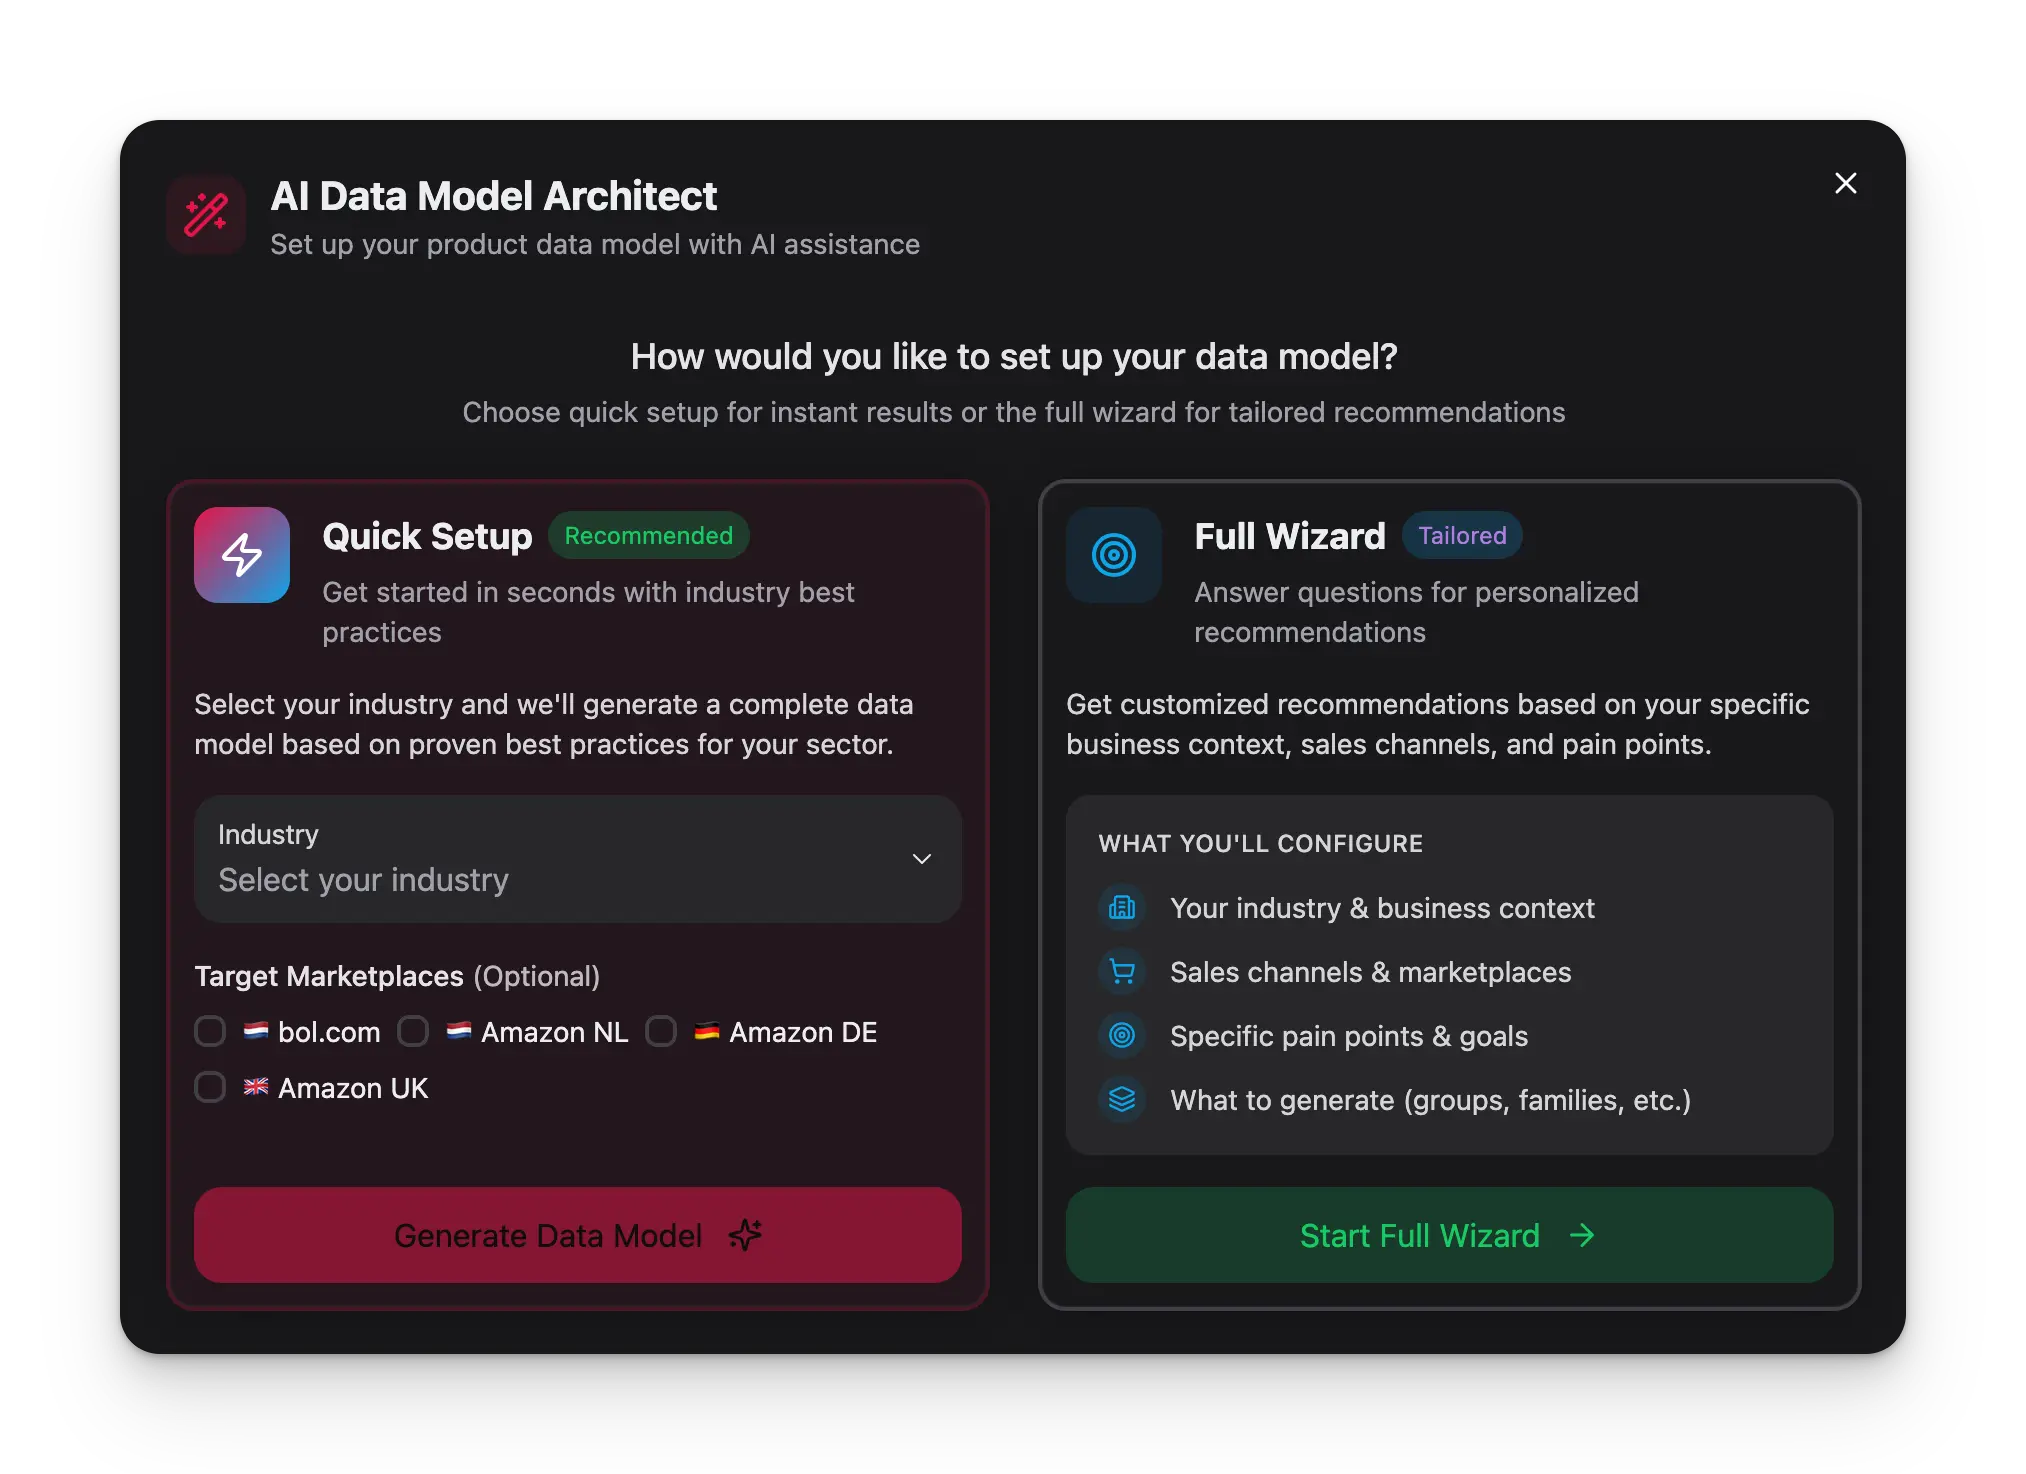 Tell the Architect what you sell. There is a quick mode that builds a model straight from the industry, and a guided wizard where you add sales channels, catalog size, pain points, and target marketplaces for a more tailored result.
Decide what to generate: general attributes, category-specific attributes, attribute groups, and families. The Architect also recommends unit of measure and option sets where they fit.
Every suggested attribute comes with a reason and priority (essential, recommended, optional). It also flags overlaps with attributes you already have, so you can merge or rename instead of creating duplicates.
See exactly how many attributes, groups, and families will be created or updated, then apply. Your model is built in seconds instead of hours.
The Architect is the fastest way to set up a new project. Generate a solid baseline, then refine the attributes you care about with per-attribute settings.
## Bulk actions on attributes
When your model grows, editing fields one at a time gets slow. Select the checkboxes on multiple attributes and a toolbar appears with actions that apply to the whole selection at once. You can select everything that matches your current filters in a single click.
* **Toggle properties**: set **required**, **unique**, **filterable**, **searchable**, **visible**, or **AI enrichable** across every selected attribute. Each property shows whether the selection is currently all on, all off, or mixed, and you choose to set it on, set it off, or leave it untouched.
* **Move to group**: reassign every selected attribute to another [attribute group](#organizing-with-attribute-groups), or ungroup them, in one move.
* **Bulk edit settings**: push validation, cleaning, and enrichment rules to every selected attribute. Each section has its own apply switch, so untouched sections are left alone, and a **Preview** tab shows the exact before-and-after changes before you commit.
* **Export to CSV**: download just the selected attributes.
* **Delete**: remove the selected attributes. A short undo window lets you reverse it if you change your mind.
Found a set of cleaning and enrichment settings that works well? Save it as a **template** from any attribute's row, then apply it to a whole selection later through Bulk edit settings. It is the fastest way to keep similar fields consistent.
## Organizing with attribute groups
Attribute groups bundle related attributes for a cleaner product form. For example, you might group "Width", "Height", and "Depth" under a "Dimensions" group.
Tell the Architect what you sell. There is a quick mode that builds a model straight from the industry, and a guided wizard where you add sales channels, catalog size, pain points, and target marketplaces for a more tailored result.
Decide what to generate: general attributes, category-specific attributes, attribute groups, and families. The Architect also recommends unit of measure and option sets where they fit.
Every suggested attribute comes with a reason and priority (essential, recommended, optional). It also flags overlaps with attributes you already have, so you can merge or rename instead of creating duplicates.
See exactly how many attributes, groups, and families will be created or updated, then apply. Your model is built in seconds instead of hours.
The Architect is the fastest way to set up a new project. Generate a solid baseline, then refine the attributes you care about with per-attribute settings.
## Bulk actions on attributes
When your model grows, editing fields one at a time gets slow. Select the checkboxes on multiple attributes and a toolbar appears with actions that apply to the whole selection at once. You can select everything that matches your current filters in a single click.
* **Toggle properties**: set **required**, **unique**, **filterable**, **searchable**, **visible**, or **AI enrichable** across every selected attribute. Each property shows whether the selection is currently all on, all off, or mixed, and you choose to set it on, set it off, or leave it untouched.
* **Move to group**: reassign every selected attribute to another [attribute group](#organizing-with-attribute-groups), or ungroup them, in one move.
* **Bulk edit settings**: push validation, cleaning, and enrichment rules to every selected attribute. Each section has its own apply switch, so untouched sections are left alone, and a **Preview** tab shows the exact before-and-after changes before you commit.
* **Export to CSV**: download just the selected attributes.
* **Delete**: remove the selected attributes. A short undo window lets you reverse it if you change your mind.
Found a set of cleaning and enrichment settings that works well? Save it as a **template** from any attribute's row, then apply it to a whole selection later through Bulk edit settings. It is the fastest way to keep similar fields consistent.
## Organizing with attribute groups
Attribute groups bundle related attributes for a cleaner product form. For example, you might group "Width", "Height", and "Depth" under a "Dimensions" group.
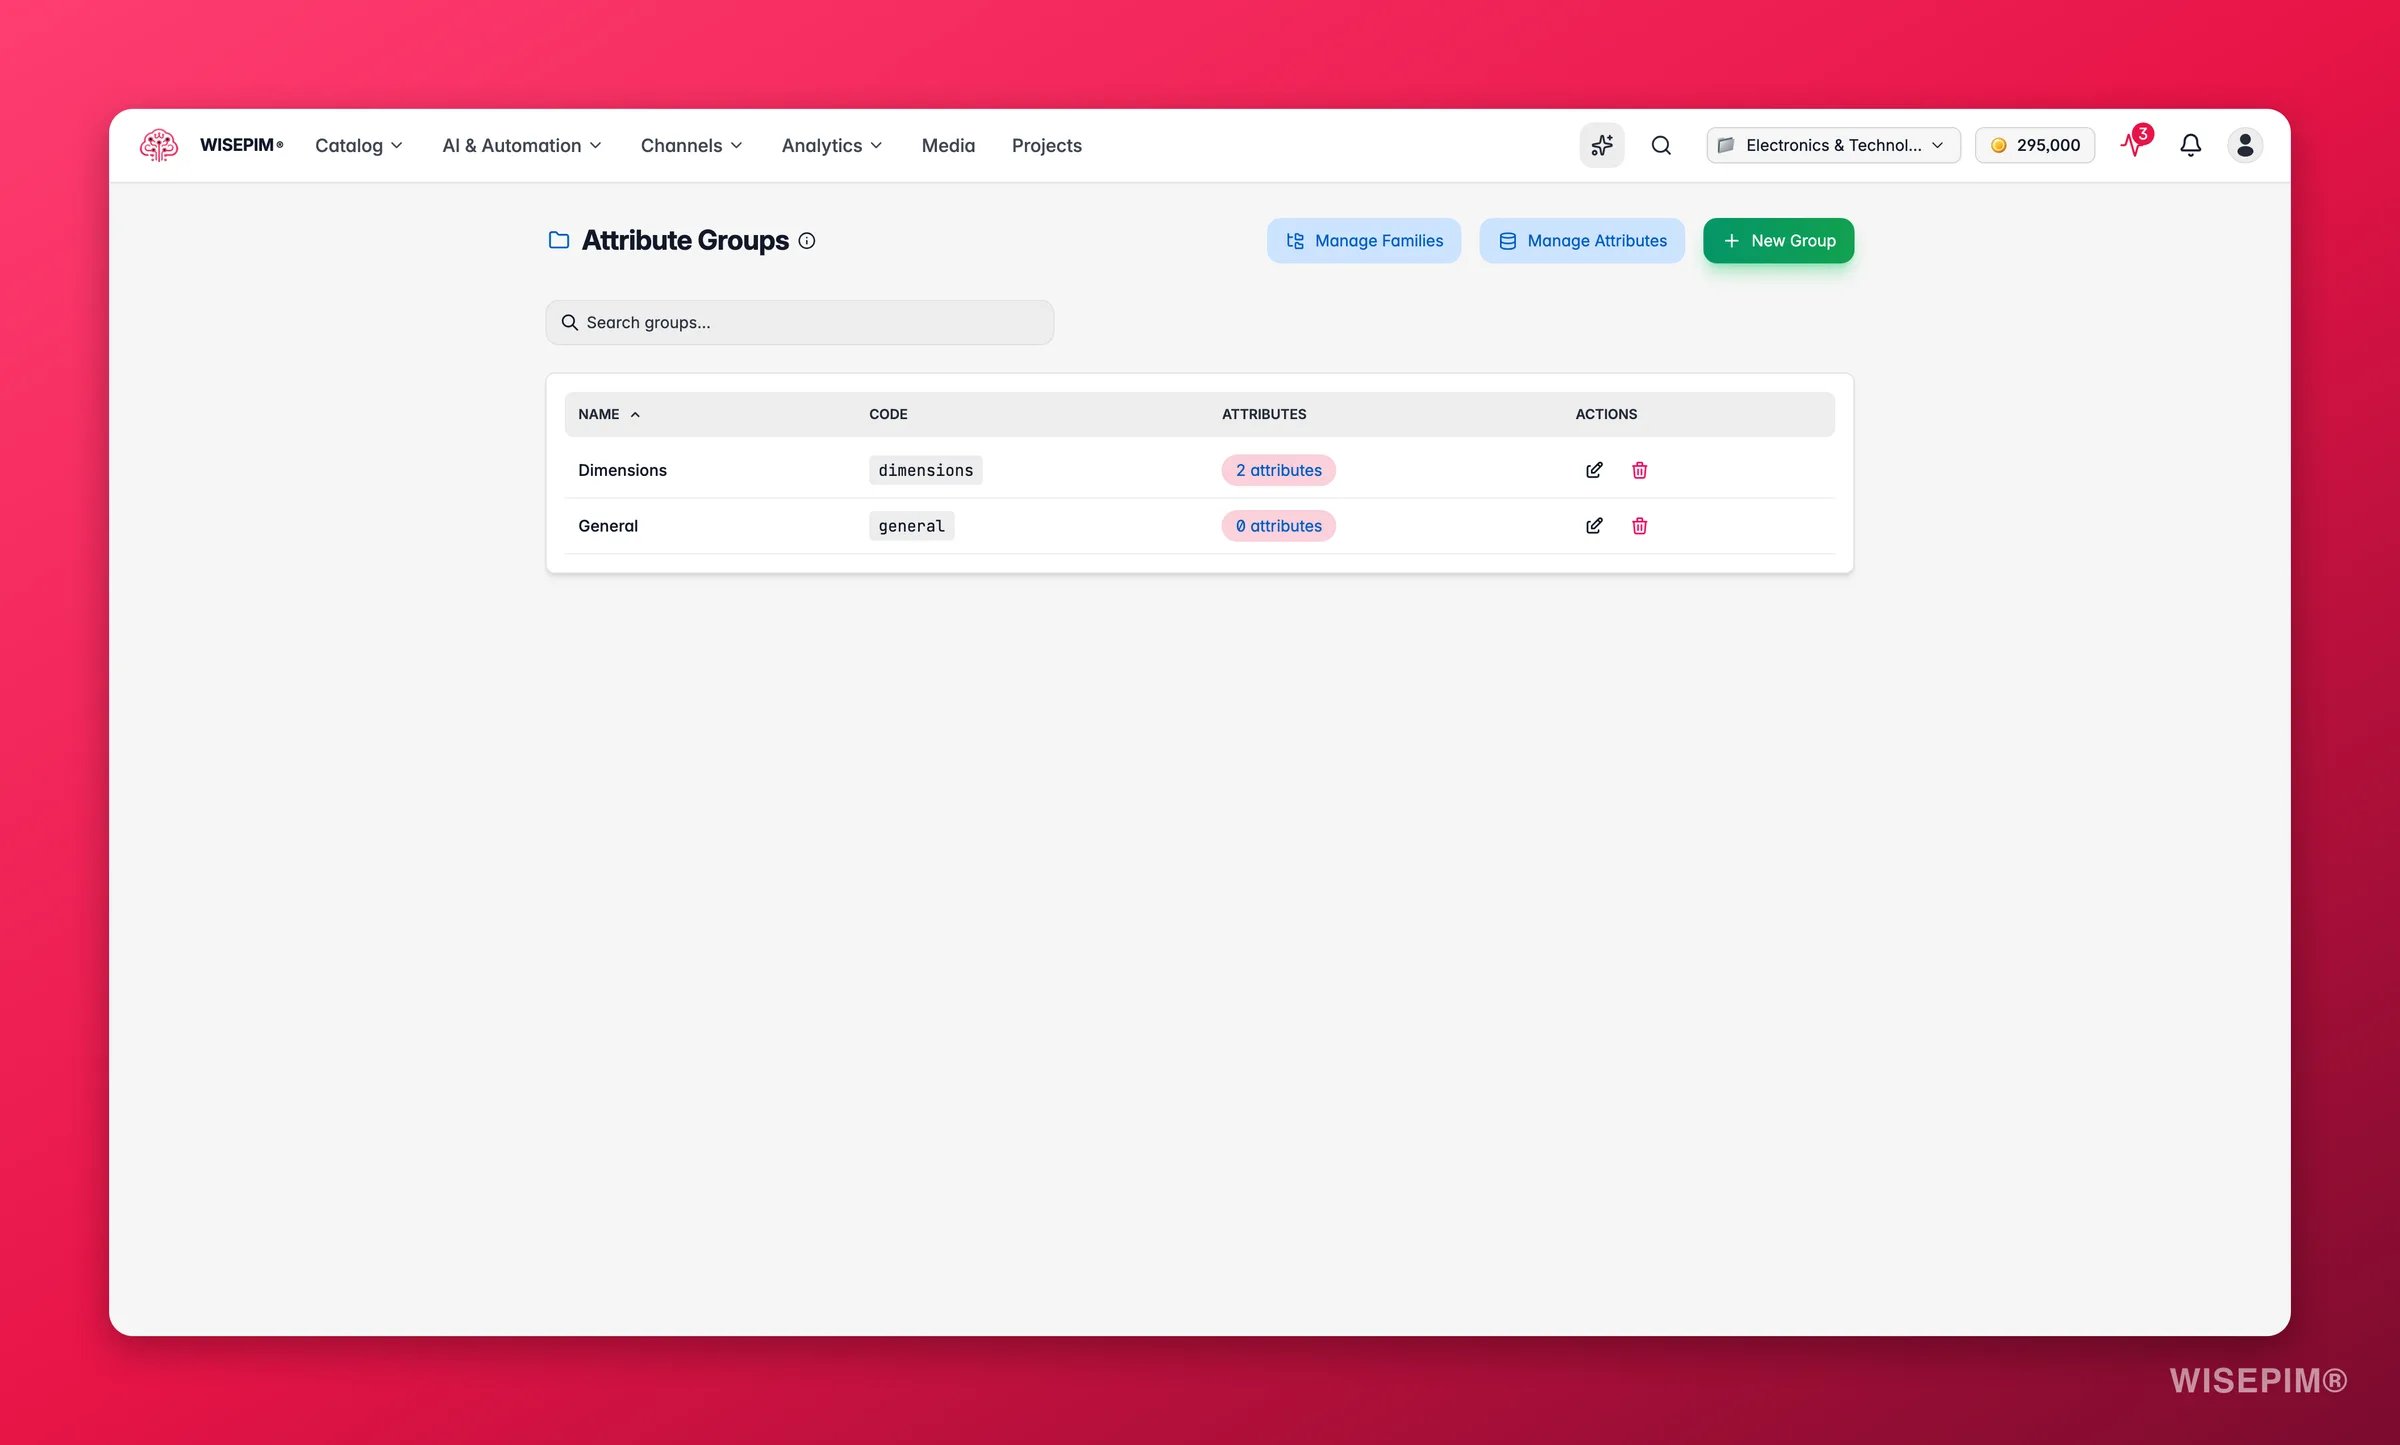
 Navigate to **Attribute Groups** from the sidebar, or from the **Manage** dropdown on the Product Attributes page.
Create a new group with a **name** and a **code**. Set a **sort order** to control where the group sits relative to other groups.
Choose whether the group shows for **all products** or only for **specific categories**. Category scope keeps forms focused, so a "Battery" group appears only on electronics, not on apparel.
Select which attributes belong in this group.
Click **Save**. The group organizes its attributes into a section in product forms.
Group attributes by purpose: a "Specifications" group for technical details, a "Marketing" group for descriptions and features, a "Logistics" group for shipping info.
## Attribute Options (shared value lists)
For **Select** and **Multi-Select** attributes, the choices can come from a shared, reusable list called an **attribute options set** (a controlled vocabulary). Instead of typing the same options into every attribute by hand, you define the list once and point multiple attributes at it. Update the list in one place and every attribute that uses it stays in sync.
Navigate to **Attribute Groups** from the sidebar, or from the **Manage** dropdown on the Product Attributes page.
Create a new group with a **name** and a **code**. Set a **sort order** to control where the group sits relative to other groups.
Choose whether the group shows for **all products** or only for **specific categories**. Category scope keeps forms focused, so a "Battery" group appears only on electronics, not on apparel.
Select which attributes belong in this group.
Click **Save**. The group organizes its attributes into a section in product forms.
Group attributes by purpose: a "Specifications" group for technical details, a "Marketing" group for descriptions and features, a "Logistics" group for shipping info.
## Attribute Options (shared value lists)
For **Select** and **Multi-Select** attributes, the choices can come from a shared, reusable list called an **attribute options set** (a controlled vocabulary). Instead of typing the same options into every attribute by hand, you define the list once and point multiple attributes at it. Update the list in one place and every attribute that uses it stays in sync.
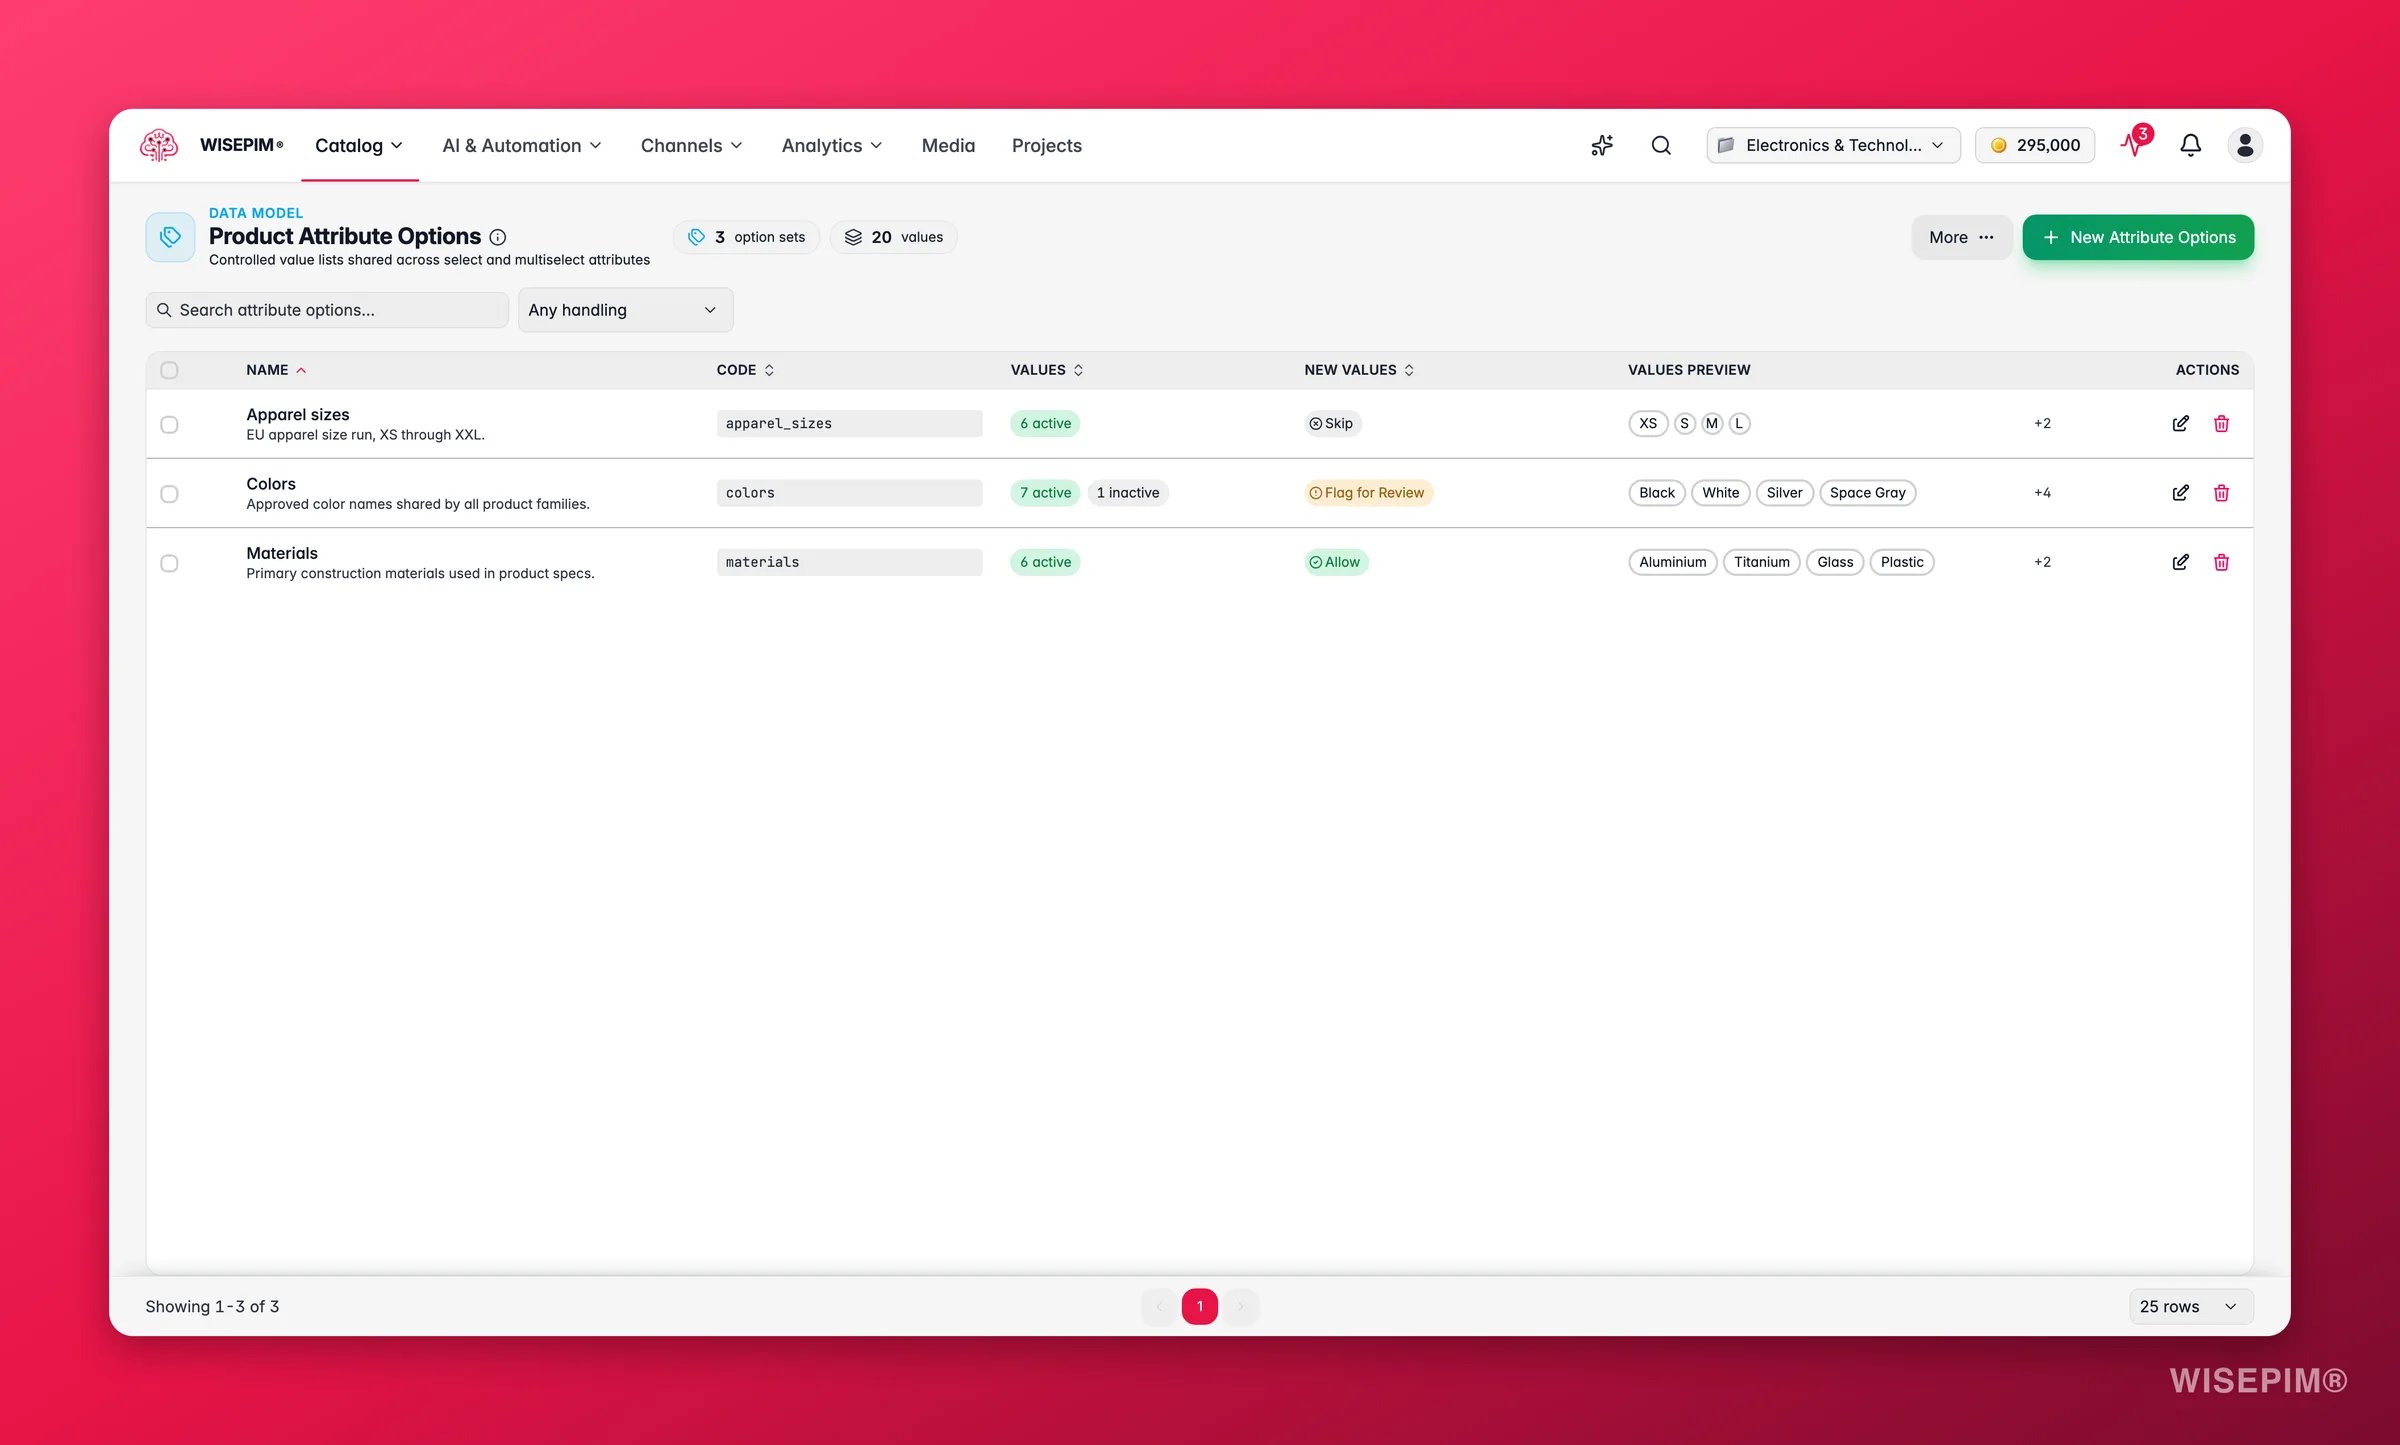
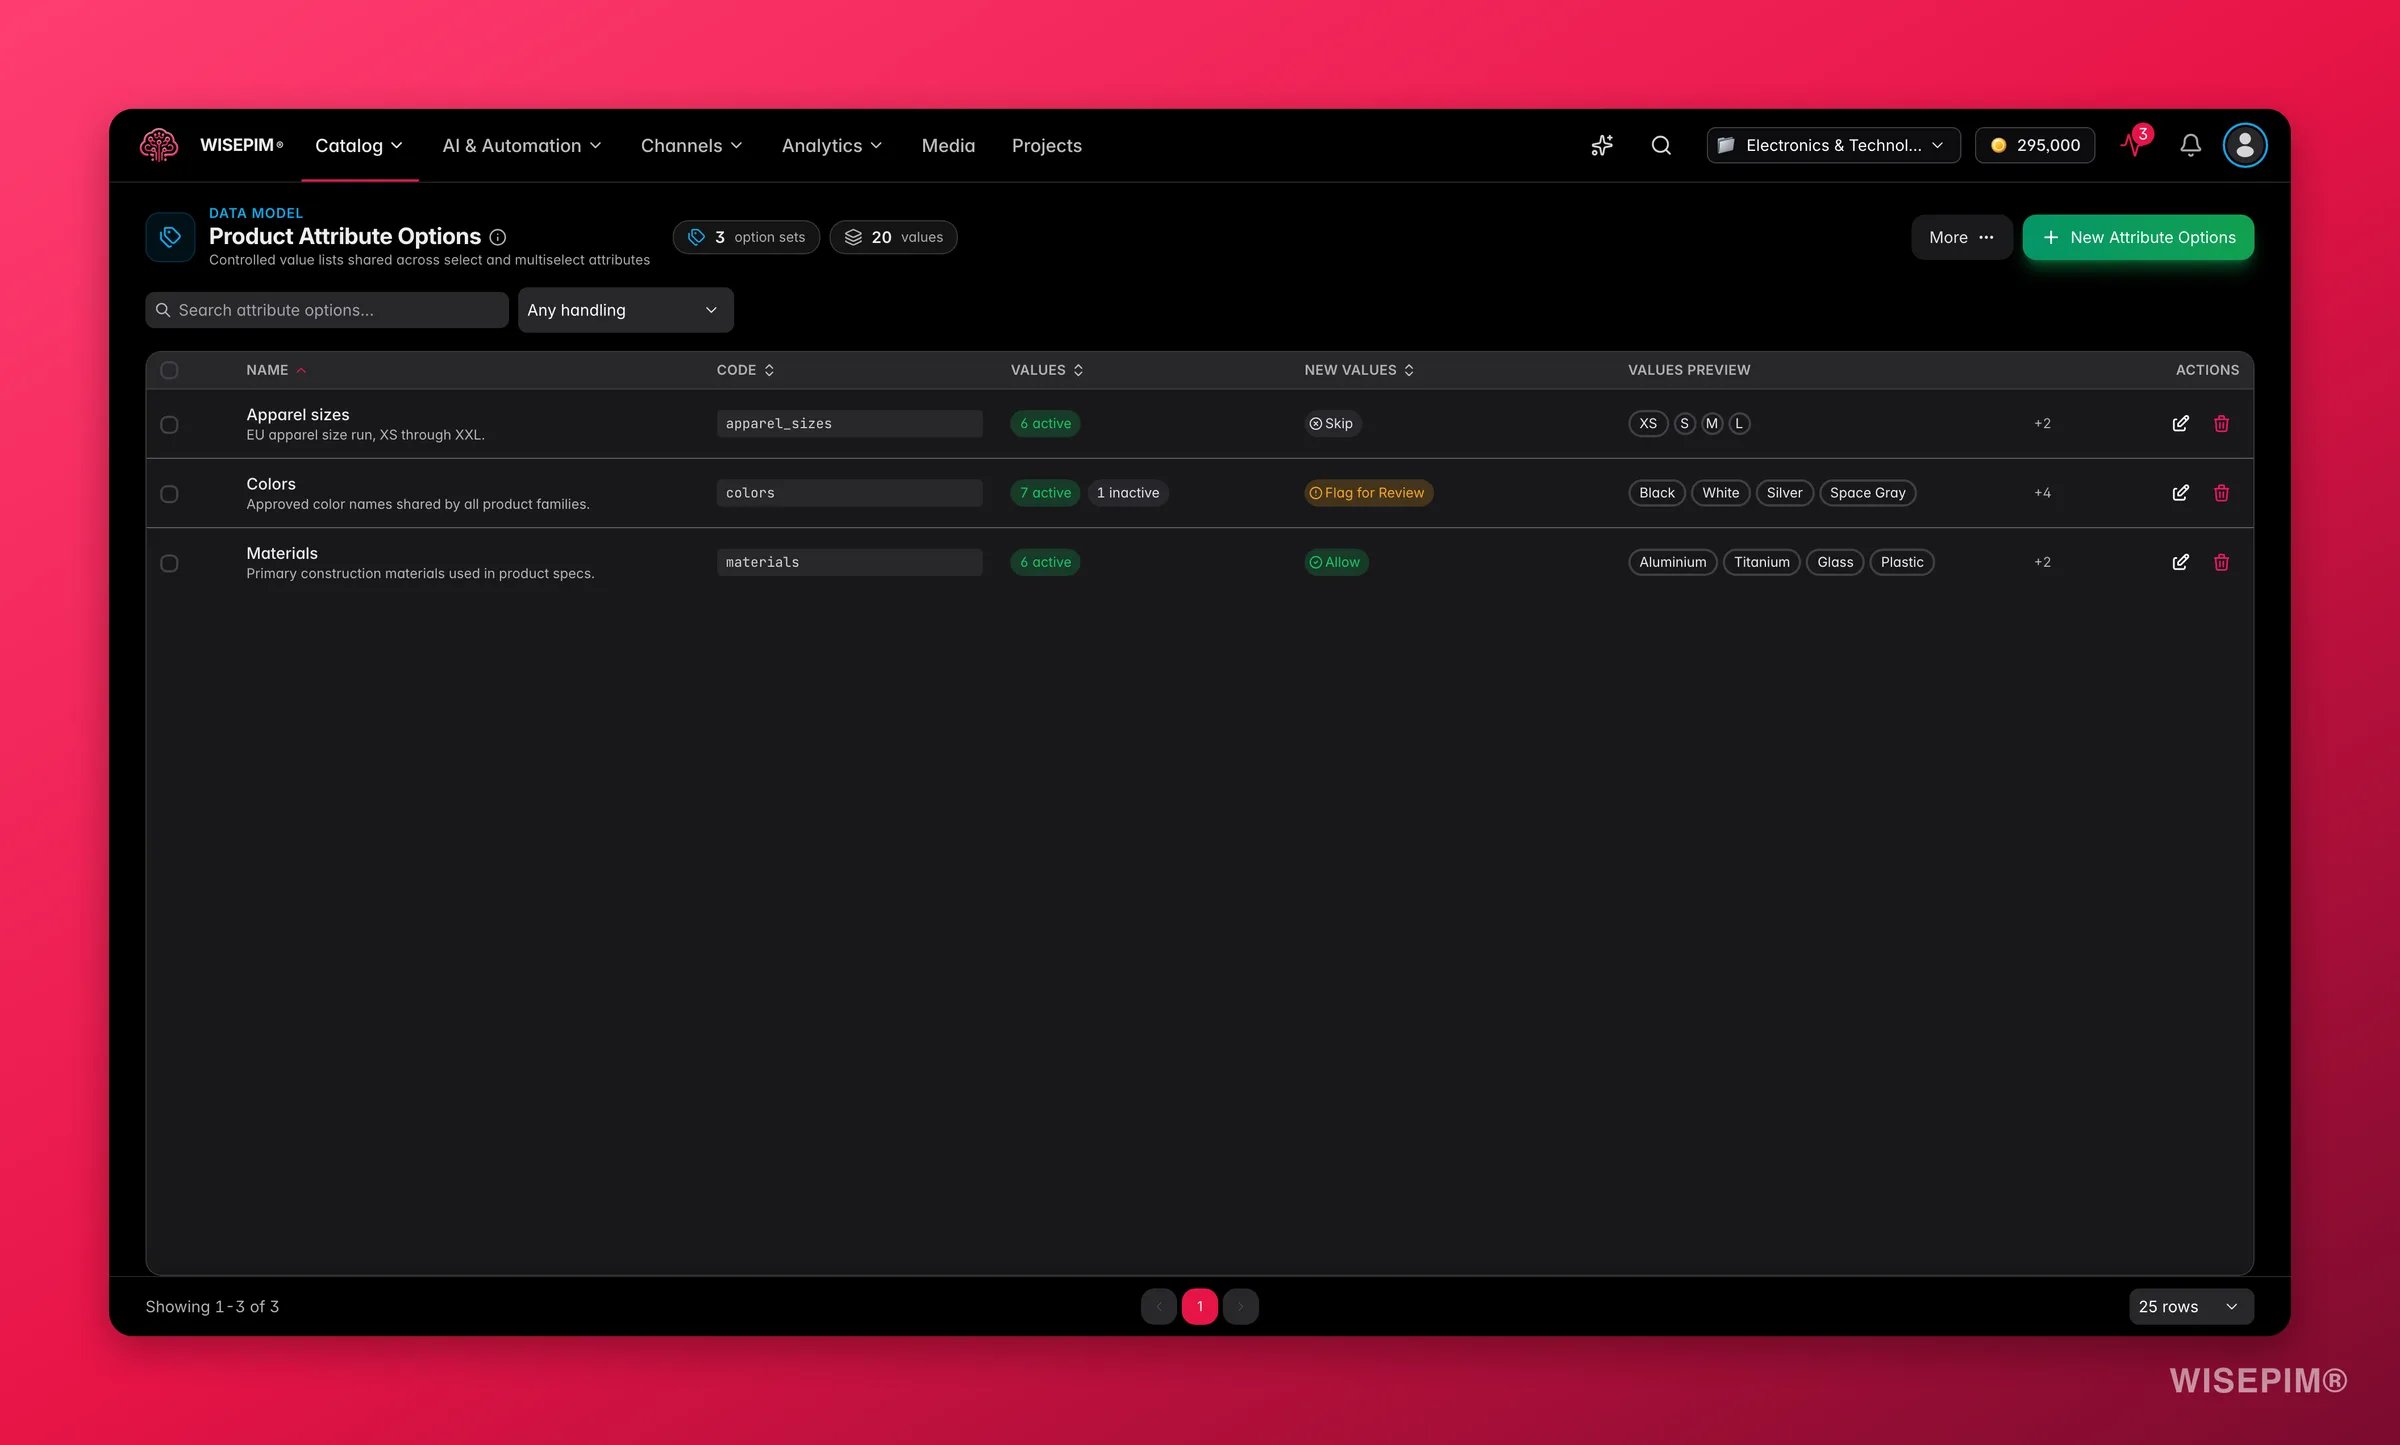 Open **Attribute Options** from the **Manage** dropdown on the Product Attributes page. Each options set has:
* A **name**, **code**, and optional **description**.
* A list of **values**, each with a code and a label per language, so your options are translated alongside the rest of your catalog.
* An **active/inactive** state per value, so you can retire an option without deleting its history.
* A **new value handling** policy that decides what happens when an import contains a value that is not yet in the list: **flag it for review**, **allow it** to be added automatically, or **skip it**.
You can build a list by hand, or import one from CSV. When you create or quick-edit a Select or Multi-Select attribute, pick **Attribute Options (shared vocabulary)** as the value source and choose the set.
Use a shared options set whenever the same list shows up on more than one attribute, for example a brand list, a material list, or a size scale. It is the single most effective way to stop near-duplicate values from creeping into your catalog.
## Import and export attributes
For larger models, you do not have to build attributes one by one.
* **Import from CSV**: click **Import** and upload a CSV to create many attributes at once. You can also import attribute definitions from a connected platform such as Magento, WooCommerce, Shopify, or a webshop importer.
* **Export to CSV**: export your selected attributes or your full filtered list to CSV. This is handy for backups, sharing your model with a teammate, or editing in a spreadsheet.
Pair export with import to bulk-edit: export your attributes, adjust them in a spreadsheet, then re-import.
## Views and filters
The Product Attributes page adapts to how you work, so a 20-attribute model and a 500-attribute model both stay manageable.
* **Three layouts**: switch between a **table**, **cards**, or a **grouped** view that organizes attributes by their group.
* **Density and columns**: toggle between compact and comfortable spacing, and choose which optional columns (code, operations, AI, sort order) to show.
* **Quick filters and search**: filter by group or type, search by label or code, and combine quick-filter chips (required, filterable, AI enrichable, has options, no group, and more) with match-all or match-any logic to zero in on exactly the attributes you need.
* **Saved views**: save a set of filters as a named view and reapply it in one click.
## Troubleshooting
### Attribute not showing in product forms
* Check that the attribute is marked as **Visible**.
* Verify the attribute is assigned to the product's [family](/en/products/product-families).
* Confirm the attribute group is not hidden by its category visibility scope.
### Validation errors during data entry
* Review the validation rules for overly strict settings.
* Check for conflicting rules (e.g., min value higher than max).
* Make sure error messages are clear so your team knows what to fix.
### Inconsistent data across products
* Switch from free-text to **Select** or **Multi-Select**, backed by a shared [attribute options set](#attribute-options-shared-value-lists) where possible.
* Enable **data cleaning** rules to normalize values automatically.
* Use the [Data Quality](/en/analytics/data-quality) tools to find and fix inconsistencies.
## Related
Assign attributes to product families to define which data each product type requires.
Link number and decimal attributes to unit code sets for consistent, convertible measurements.
Organize products into hierarchical categories for navigation and filtering.
Track completeness and fix inconsistent attribute values across your catalog.
Open **Attribute Options** from the **Manage** dropdown on the Product Attributes page. Each options set has:
* A **name**, **code**, and optional **description**.
* A list of **values**, each with a code and a label per language, so your options are translated alongside the rest of your catalog.
* An **active/inactive** state per value, so you can retire an option without deleting its history.
* A **new value handling** policy that decides what happens when an import contains a value that is not yet in the list: **flag it for review**, **allow it** to be added automatically, or **skip it**.
You can build a list by hand, or import one from CSV. When you create or quick-edit a Select or Multi-Select attribute, pick **Attribute Options (shared vocabulary)** as the value source and choose the set.
Use a shared options set whenever the same list shows up on more than one attribute, for example a brand list, a material list, or a size scale. It is the single most effective way to stop near-duplicate values from creeping into your catalog.
## Import and export attributes
For larger models, you do not have to build attributes one by one.
* **Import from CSV**: click **Import** and upload a CSV to create many attributes at once. You can also import attribute definitions from a connected platform such as Magento, WooCommerce, Shopify, or a webshop importer.
* **Export to CSV**: export your selected attributes or your full filtered list to CSV. This is handy for backups, sharing your model with a teammate, or editing in a spreadsheet.
Pair export with import to bulk-edit: export your attributes, adjust them in a spreadsheet, then re-import.
## Views and filters
The Product Attributes page adapts to how you work, so a 20-attribute model and a 500-attribute model both stay manageable.
* **Three layouts**: switch between a **table**, **cards**, or a **grouped** view that organizes attributes by their group.
* **Density and columns**: toggle between compact and comfortable spacing, and choose which optional columns (code, operations, AI, sort order) to show.
* **Quick filters and search**: filter by group or type, search by label or code, and combine quick-filter chips (required, filterable, AI enrichable, has options, no group, and more) with match-all or match-any logic to zero in on exactly the attributes you need.
* **Saved views**: save a set of filters as a named view and reapply it in one click.
## Troubleshooting
### Attribute not showing in product forms
* Check that the attribute is marked as **Visible**.
* Verify the attribute is assigned to the product's [family](/en/products/product-families).
* Confirm the attribute group is not hidden by its category visibility scope.
### Validation errors during data entry
* Review the validation rules for overly strict settings.
* Check for conflicting rules (e.g., min value higher than max).
* Make sure error messages are clear so your team knows what to fix.
### Inconsistent data across products
* Switch from free-text to **Select** or **Multi-Select**, backed by a shared [attribute options set](#attribute-options-shared-value-lists) where possible.
* Enable **data cleaning** rules to normalize values automatically.
* Use the [Data Quality](/en/analytics/data-quality) tools to find and fix inconsistencies.
## Related
Assign attributes to product families to define which data each product type requires.
Link number and decimal attributes to unit code sets for consistent, convertible measurements.
Organize products into hierarchical categories for navigation and filtering.
Track completeness and fix inconsistent attribute values across your catalog.